Background Removal
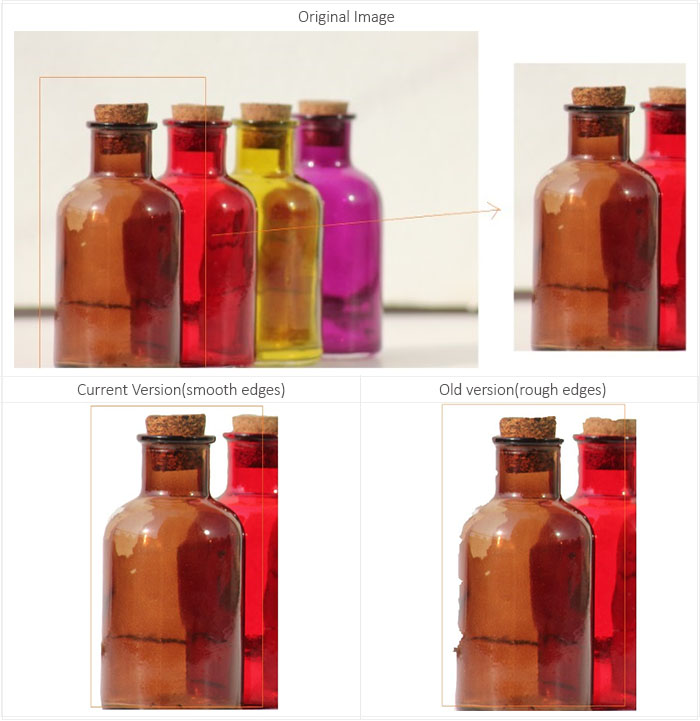
rupitrN’s BG removal is a high-quality process with smooth edge cutting. Complete BG process is based on a standard algorithm the ‘Grabcut Algorithm’. Grabcut algorithm comes under “Machine Learning”.
Machine learning is a scientific study that works on the basis of searching similar information(color) around its neighboring pixels. The learning process is based on the principle of “Mahalanobis Distance”, that is the learning is based on the distance covered by similar color pixels.
In the beginning, we used this algorithm to make BG removal process automated, i.e. as soon as you open an image in the editor, background, and foreground gets separated automatically. The automated system defines the product boundaries and eliminates the background. But there were certain problems in the automatic process because of which it was not quite ready, like:
- No fixed criteria was there to select the object in the image frame, as the position of an object can be different in different images.
- For an automated BG removal, the software needs to have a repeated database of images, so that it would be easy for the software to analyse the product shape.
- The automated process was only successful for the images that have a contrasting background, no colour of the object should be there in the background.
Since there were problems in the automated system, so the process was shifted to “Marking based BG removal”. In this, you will have to indicate the software by marking foreground & background, & you will get the results in a single go.
Improvements made in BG Removal
- Improvement in the machine learning process: In the automated grabcut algorithm, it was difficult for the software to recognize the foreground and background easily. Thus to remove this problem in the latest version, we are defining the foreground and background in advance by marking them separately using green(for foreground) and red(for background) markings tool. So now it is easy for the software to differentiate between the foreground and background, hence a clear output can be achieved.
-
Matting: Matting is done to keep the edges of the foreground in such a way that it gets easily merged with different color backgrounds.
How can you see the effects of matting?
If you zoom foreground of an image to the corners, you will see that the color of object keeps on getting transparent with each increasing pixel(in total the effect of matting is visible on last 7 pixels) and easily gets merged with the background. This makes the object look realistic as the gradual increase in edge transparency helps the object to merge with different background easily.

-
Rough edges: There were some problems in the edges of the object, the edges were not cut smoothly.
To solve this problem “contouring process” was followed, contouring means to define the path. That means the marking of foreground was improved to a level that it can clearly define it’s path & can cover the edges of the object properly.
- To solve this problem “contouring process” was followed, contouring means to define the path. That means the marking of foreground was improved to a level that it can clearly define it’s path & can cover the edges of the object properly.
Levels & Curve
Before we go further to understand Levels & Curves in rupitrN, we must know how to analyse the histogram of image.
Understanding Image Histogram
Have you ever wondered the image you captured from your DSLR looked brighter on viewfinder at the time of capturing but when you downloaded it on your
computer it looked darker? Or did you ever got a complaint from your client that the red bangles color is different from that of actual product whereas you are sure that you delivered the right color? Or the image is looking dull. Well, both of you may be right.
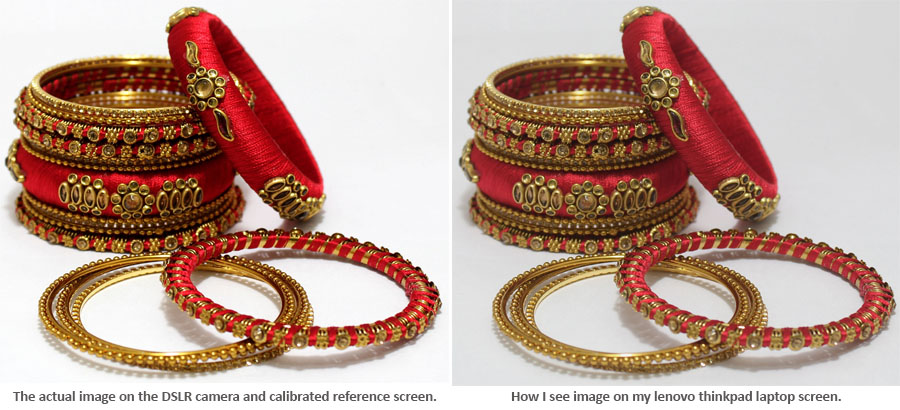
The reason why things looked different to both of you depends on variety of factors like, color calibration of screen, brightness settings, different adjustment of display screen gamma(gamma defines the mathematical relationship between the red, green and blue color values that are sent to display an amount of light that ultimately emitted from it). Therefore you can’t judge image quality by looking at the image from your naked eyes on a screen.
A better way to judge an image is by reading the histogram. An image histogram is a graphical representation of the tonal distribution in a digital image. It plots the number of pixels for each tonal value from 0 to 255. It is the scientific way of evaluating exposure, so no matter which screen you are using, the histogram tool will give you the same result in all the devices.
In an image histogram, the x-axis shows the color intensities and the y-axis shows the frequency(i.e how many times a particular intensity has appeared in an image) of these intensities.
A digital image is made up of pixels which are like dots on a sheet of paper. The more pixels you have per inch of your screen, the more vivid the image is. Pixel counts can be expressed as a single number, as in a “three-megapixel” digital camera, which has a nominal three million pixels, or as a pair of numbers, as in a “1024 by 768 display”, which has 1024 pixels from side to side and 768 from top to bottom (as in a VGA display), and therefore has a total number of 1024X768= 786,432 pixels or 0.7 megapixels. Every pixel signifies one particular color in an image. As we all know that computer only understands 0(No signal) and 1(Signal), we assign bits to represent different colors of the color spectrum. Each pixel reads a certain number of “bits” to display color. For instance, if we assign 24 bits to every pixel, eight bits are dedicated to each of three colors — red, green, and blue. This is also called “true color” because it can produce 10,000,000 colors perceptible to the human eye. But since it will take up a lot of memory space on your hard disk, we generally assign 8 bits per pixel.
i.e. 28 = 256 colors can be shown from RGB color Spectrum.
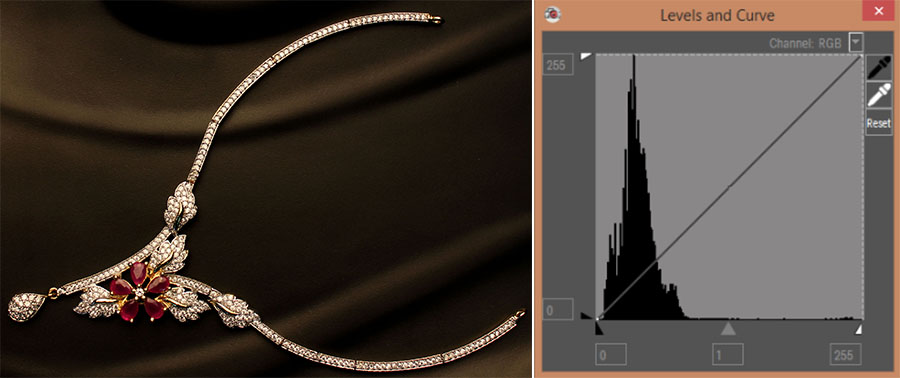
As you can see from the graph, that we have got peaks in the leftmost region which signifies that the image has a lot of dark areas without much middles and bright tones. Therefore even without looking at the image, you can predict what kind of image it might be.
Let’s take a closer look, here the left side of the graph represents the blacks or shadows, the right side represents the highlights or bright areas and the middle section is mid-tones (grey). The height of the peaks represents the number of pixels in that particular tone.
Two different images can have the same histogram but two different histograms can’t have the same image.
Levels
A level is a tool which is used to correct the tonal range of an image by adjusting highlights, shadows, and mid-tone regions. It is a simplified version of Curves which gives you limited control but most often is sufficient for post-processing. It is generally used to enhance the contrast of an image by making the shadows darker and/or highlights brighter. Before we go further to understand Levels in rupitrN, we must know how to analyze the histogram of an image.
How to increase contrast using Levels?
In a histogram, “Input Levels” are mapped to the “Output Levels” and by default, black input slider is mapped to output slider at 0 and white input slider is mapped to output slider at 255.
With the output slider in the default position, if you move black input slider to x position then all the pixels which come under 0 to x will be made 0. And upon moving white input slider to y position then all the pixels which come under y to 255 will be remapped to 255. All other pixels will be redistributed between 0 to 255.
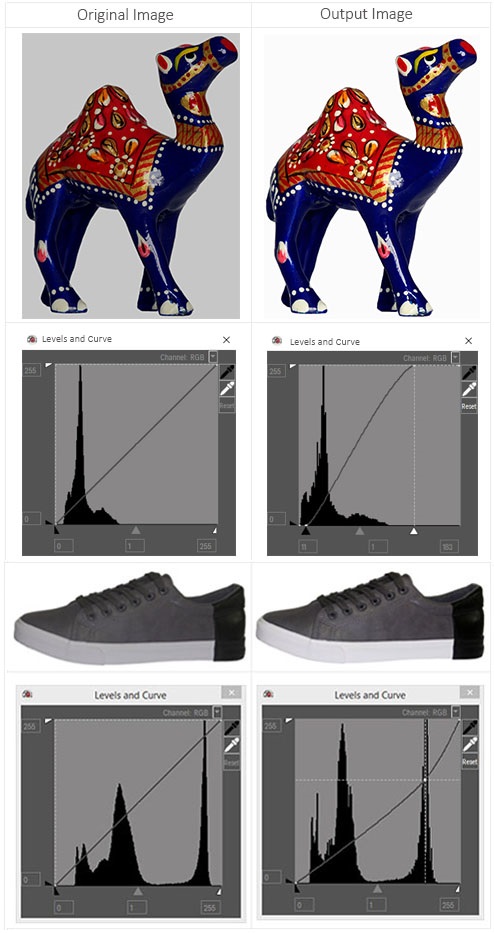
Here all the pixel values of black input slider from 0 to 11 are remapped to 0 and the pixel values of white input slider from 255 to 183 are remapped to 255.
To increase the overall contrast of an image (if an image is not using the full tonal range), most of the time you should simply drag the black input pointer inward to the left end of the histogram and the white input pointer to the right end of the histogram. By doing this we are darkening the shadows and
brightening the highlights causing overall histogram to expand to full tonal range.
Using Gamma Slider
When the image contains mid tones and we do not want a strong white and black colors then moving midtone/gamma slider can subtly expand the histogram while not making the image overexposed or underexposed.
Curves
The most important and powerful tool you can use to post-process an image is Curves. But before understanding Curves, make sure that you know how to read a histogram.
Curves are similar to levels, i.e. it helps to change the tonal range of the image as per your requirements. The main difference between levels and curves are
- Levels only provide three points of reference(black, grey & white) and do not provide control on to each and every pixel.
- Levels don’t provide control over the histogram.
Though curves can give you the capability to fine-tune your image, but it is not advisable to use curves if you are not adept with this tool since even a slight change can significantly affect the output.
Curves provide huge control over an image. By default, a curve is set to a perfect diagonal which means that there is no modification done in the image, i.e the values of the X-axis(input) and Y-axis(output) are same. If you add a control point to the curve at any point and move it below the diagonal, you are darkening the image, and if it is moved above the diagonal, you are brightening the image tones.
Pickers
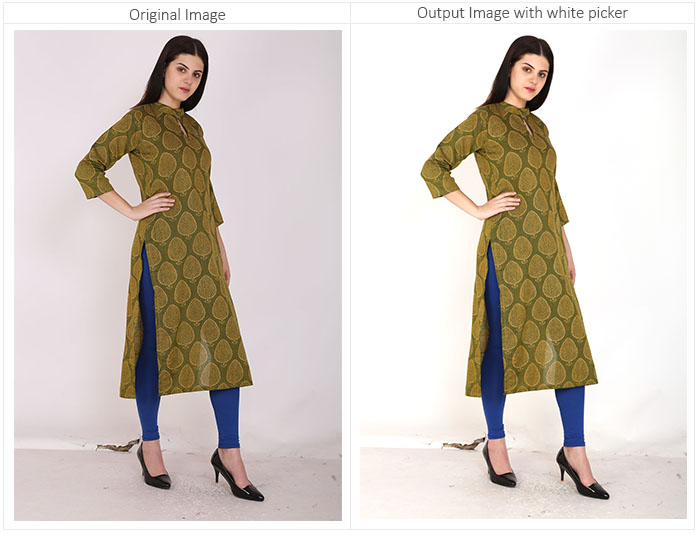
Pickers are used for removing the unwanted tints and color casts from an image which negatively affects the true color of a product. Picker allows you to select the pixels on the image, which you want to be pure black or pure white. Capturing an image of an object in different light sources can cause color cast problems in the shadows. If you want to use pickers, then use them first because pickers reset any changes done on levels and curves.
Every light source emits light with a unique hue. Colors moving towards red are warm and colors moving towards blue is cool. When photographers are capturing photos outside in sunlight or inside using studio lights, the light emitted from every light source casts its own hue on the scene. These hues are captured by the camera, they can be neutralized by using pickers. So, that photographs captured beneath a warm light, still looks white.
Define Black and White points using pickers
- White picker is used when you want to change the color of a pixel to pure white affecting the whole image proportionally.
- Similarly , black picker is used to change the color of a pixel to pure black affecting the whole image proportionally.
- Select a picker and move the cursor over the image .
- Select a pixel from the image to change its color to pure black or white.
- Click on that pixel , this will change the color of this pixel with respect to the selected picker and the other pixels of the image will also be affected proportionally.
- If you do not want a pure black or pure white color then there is also an option of changing the target value of black or white picker. You can do so by double clicking on any one and selecting a shade.
- You can also set the target value of picker to a color in an image or screen with “Pick screen color” option present in “select color” window.
How organized image structure can help you ?
Chronologically organizing your images from the beginning to present gives you a great overview of how you have progressed since the very first time you picked up your camera. You will also notice not only the difference in the content of what you are photographing but the quality of it as well.
Organizing photos can also guide you to avoid recurring mistakes because it is easy to review your work if things are well organized and during the review, you will probably realize there are one, two or more mistakes you are constantly making.
You can showcase your potential to your client with an organized image workflow if your client asks for some of your creative work you don’t want to spend a lot of time looking for a single photo if you do not have organized image workflow.
Right after capturing the image to the editing process an organized image workflow can save a lot of time of a photographer, because after capturing a photo it takes time to decide which image is best out of all and can go for the editing process By organizing your images at one place it is easier to review them.
SD cards are not very reliable, especially for long term storage. While capturing the images with DSLR camera, images are stored in SD card and for editing, you will have to transfer them to a pc. Later you’ll format the SD card for fresh use. All this is not needed in rupitrN. In rupitrN, captured images are automatically getting stored in pc and are visible in the collection section of rupitrN.
Focus your creative energies where they are meant to be….
Leave everything else to us…
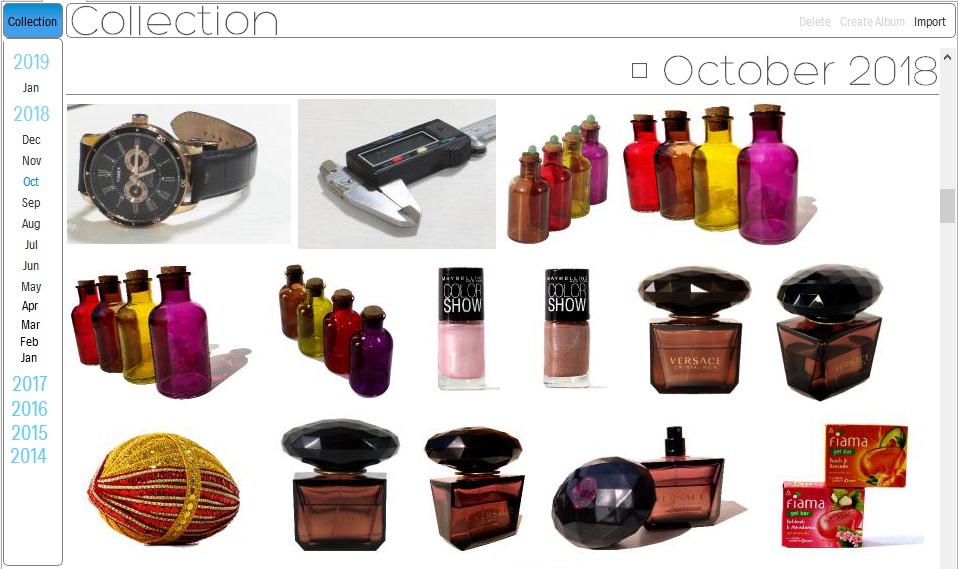
Collection
The collection is a section in rupitrN where all captured images are automatically stored in reverse chronological order with the latest month’s images coming on top.
Year and month folders are automatically created when images are captured or imported. By default images follow a unique naming convention in the format of day and month it was captured on, the complete sequence is
“Day-Month-Date-Year-Time(Hours-Minute-Seconds)”. This helps in uniquely identifying each image at any point in time.
Collection section consists of three functionalities import, create an album and delete.
Import is used for importing the images to rupitrN from outside. If you want to edit an already captured image (by any camera or smartphone ) then you can import it to rupitrN and edit.
With create an album, you can create different albums for different products or clients so that images can be managed easily.
Delete is used for deleting the images from rupitrN permanently.
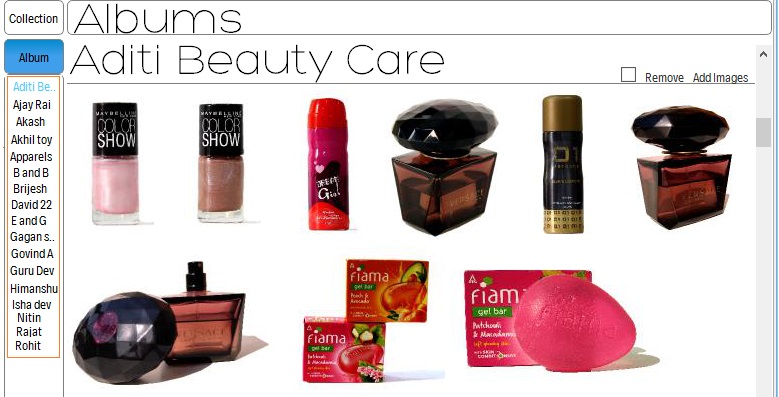
Album
If you want to further organize your images in some other pattern say client name or product category wise then the default chronological order, Album section can help you do so.
All albums are ordered in alphabetical order in rupitrN so they are easy to access. Any number of images can be stored in an album.
Each album consists of two functionalities remove and add images.
Remove is used for removing the images
from album. You can also remove the whole album, by clicking on the checkbox present above the album opposite to the album name.
After creating an album, if you want to add any new images to the existing album then you can use “add images”. After creation of albums, all albums will appear with their album names at the right-hand side of the window in alphabetical order. By clicking on an album name, you will move to that album section.